
3.2 Handling your files
The database view lists all pdb files from your disc that have been imported into the program, divided into one list for proteins and one for lipids.
Each row in front of the lists represents a different file. It shows the basic information about it including the Pdb Code, the Header and a short version of the title and source contents. You can also find a cell containing a user comment what will be described later. There is also a column that shows the filepath of the entry. The last column indicates whether or not the pdb file has multiple models. The first column can be used to add molecule instances to the current membrane while the icon indicates whether OPM or PDBTM alignment data is available for that file.
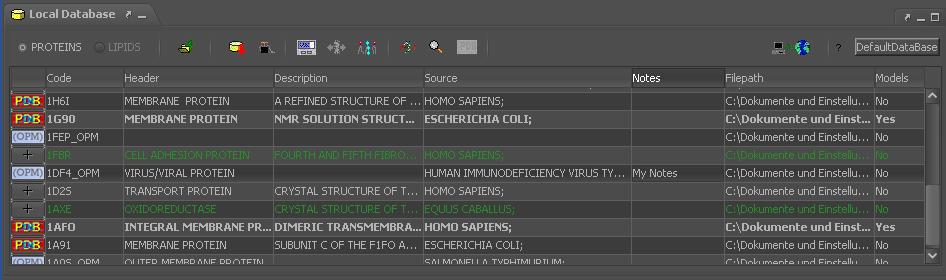
The Local Database View
Each entry provides a context menu with various options. It can be accessed by right-clicking on an entry.
Importing files to the local collection
In order to add one or more files to your collection, press the 'Import' button 
You will be prompted to choose your pdb files then. The files that have already been added are indicated by a green check mark. Make your selection and press 'Ok' in order to import the selected files.
Editing an entry
You can edit an entry any time by double-clicking a referring entry or by using the 'Edit'  button from the popup menu. If you do so, a dialog window will appear.

The 'Edit Entry' Dialog
This dialog offers 3 different options:
Changing the filepath of an entry
You always have the option to change the filepath of an entry by pressing the  button. This is useful if the referring file has been renamed or moved meanwhile.
Change category
If you want to move a protein entry to the lipid list (or vice versa),
use the 'Category' switcher at the top.
User comment
You may want to enter / edit a user comment for an entry. This can be done in the 'Notes' text field. The entered text will be displayed not only in the list. It will also appear in the molecule's properties when the entry gets used in a membrane later. Note that user comments are only menat for internal use. They will not be used in any output of this program.
Removing an entry
f you want to remove an entry from one of the lists, simply mark it in the list and use the 'Remove'  button either in the toolbar or in the popup menu of the entry.
In the popup menu, an entry can also be removed by using the 'Delete'  button. That will remove the entry and delete its file from your disc. You will be prompted before this operation.
State of an entry
In entry can have 4 different appearances (text color and style) used for indicating its current state:
| Plain black text | A single-model entry ready to be used |
| Bold black text | A multi-model entry ready to be used. |
| Green text |
An entry that is currently used in the opened membrane. |
| Red text |
Indicates that the entry's file cannot be read. You will have to restore the file or change the filepath before you can use the entry again. |
- Details
- Written by bjoern
- Category: Cm2help 3. Managing local PDB Files
- Published: 14 September 2013
- Hits: 12773
 Cm2 MembraneEditor
  project ...
 help
help